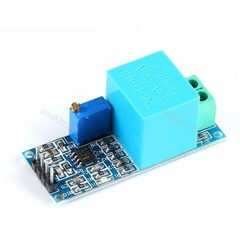
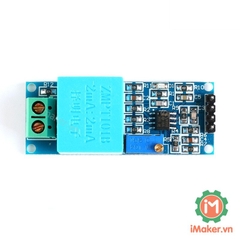

Cảm biến điện áp AC Voltage Sensor ZMPT101B được sử dụng để đo điện áp AC 1 cách chính xác bằng cuộn biến áp ZMPT101B (voltage Transformer), cảm biến có khả năng đo tối đa 250VAC với biến trở tinh chỉnh giá trị Ananlog đầu ra tích hợp, sử dụng cho các ứng dụng đo điện áp AC với Arduino hoặc Raspberry Pi,...
Thông số kỹ thuật:
Sơ đồ chân:

Code tham khảo Arduino:
#include <Filters.h> //Easy library to do the calculations
#include <SPI.h> //Libraries for the OLED display
#include <Wire.h>
#include <Adafruit_GFX.h>
#include <Adafruit_SSD1306.h>#define SCREEN_WIDTH 128 // OLED display width, in pixels
#define SCREEN_HEIGHT 32 // OLED display height, in pixels
#define OLED_RESET -1 //Adafruit_SSD1306 display(SCREEN_WIDTH, SCREEN_HEIGHT, &Wire, OLED_RESET); //Declaring the display name (display)
float testFrequency = 50; // test signal frequency (Hz)
float windowLength = 40.0/testFrequency; // how long to average the signal, for statististint Sensor = 0; //Sensor analog input, here it's A0
float intercept = -0.04; // to be adjusted based on calibration testing
float slope = 0.0405; // to be adjusted based on calibration testing
float current_Volts; // Voltageunsigned long printPeriod = 1000; //Refresh rate
unsigned long previousMillis = 0;
void setup() {
Serial.begin( 9600 ); // start the serial port
display.begin(SSD1306_SWITCHCAPVCC, 0x3C); //Start the OLED display
display.clearDisplay();
display.setTextSize(2);
display.setTextColor(WHITE);
display.setCursor(1,1);
display.print("SurtrTech");
display.setCursor(1,20);
display.setTextSize(1);
display.print("AC Voltmeter");
display.display();
delay(5000);}
void loop() {
RunningStatistics inputStats; //Easy life lines, actual calculation of the RMS requires a load of coding
inputStats.setWindowSecs( windowLength );
while( true ) {
Sensor = analogRead(A0); // read the analog in value:
inputStats.input(Sensor); // log to Stats function
if((unsigned long)(millis() - previousMillis) >= printPeriod) {
previousMillis = millis(); // update time every second
Serial.print( "\n" );
current_Volts = intercept + slope * inputStats.sigma(); //Calibartions for offset and amplitude
current_Volts= current_Volts*(40.3231); //Further calibrations for the amplitude
Serial.print( "\tVoltage: " );
Serial.print( current_Volts ); //Calculation and Value display is done the rest is if you're using an OLED display
display.clearDisplay();
display.setTextSize(3); //size of the text that will follow
display.setTextColor(WHITE); //its color
display.setCursor(1,1); //position from where you want to start writing
display.print(current_Volts,1);
display.setCursor(115,00);
display.setTextSize(2);
display.print("V");
display.setCursor(115,15);
display.setTextSize(1);
display.print("AC");
display.display();
}
}}
Tài liệu tham khảo:
Video tham khảo:
1. BẢO HÀNH
Bảo hành sản phẩm là: khắc phục những lỗi hỏng hóc, sự cố kỹ thuật xảy ra do lỗi của nhà sản xuất.
1.1. Quy định về bảo hành
– Sản phẩm được bảo hành miễn phí nếu sản phẩm đó còn thời hạn bảo hành được tính kể từ ngày giao hàng, sản phẩm được bảo hành trong thời hạn bảo hành ghi trên Sổ bảo hành, Tem bảo hành và theo quy định của từng hãng sản xuất liên quan đến tất cả các sự cố về mặt kỹ thuật.
– Có Phiếu bảo hành và Tem bảo hành của công ty hoặc nhà phân phối, hãng trên sản phẩm. Trường hợp sản phẩm không có số serial ghi trên Phiếu bảo hành thì phải có Tem bảo hành của CÔNG TY DOLA (kể cả Tem bảo hành gốc).
1.2. Những trường hợp không được bảo hành
– Sản phẩm đã hết thời hạn bảo hành hoặc mất Phiếu bảo hành.
– Số mã vạch, số serial trên sản phẩm không xác định được hoặc sai so với Phiếu bảo hành.
– Tự ý tháo dỡ, sửa chữa bởi các cá nhân hoặc kỹ thuật viên không phải là nhân viên CÔNG TY DOLA
– Sản phẩm bị cháy nổ hay hỏng hóc do tác động cơ học, biến dạng, rơi, vỡ, va đập, bị xước, bị hỏng do ẩm ướt, hoen rỉ, chảy nước, động vật xâm nhập vào, thiên tai, hỏa hoạn, sử dụng sai điện áp quy định.
– Phiếu bảo hành, Tem bảo hành bị rách, không còn Tem bảo hành, Tem bảo hành dán đè, hoặc Tem bảo hành bị sửa đổi (kể cả Tem bảo hành gốc).
– Trường hợp sản phẩm của Quý khách hàng dán Tem bảo hành của CÔNG TY DOLA hay nhầm lẫn thông tin trên Phiếu bảo hành, Phiếu mua hàng: Trong trường hợp này, bộ phận bảo hành sẽ đối chiếu với số phiếu xuất gốc lưu tại Công ty, hóa đơn, phần mềm của Công ty hay thông tin của nhà phân phối, hãng, các Quý khách hàng khác mua cùng sản phẩm cùng thời điểm, nếu có sự sai lệch thì sản phẩm của Quý khách không được bảo hành (có thể Tem bảo hành của Công ty bị thất thoát và bị lợi dụng dán lên thiết bị hay nhầm lẫn nhỏ khi nhập, in ra). Kính mong Quý khách hàng thông cảm!
– Bảo hành không bao gồm vận chuyển hàng và giao hàng.
2. BẢO TRÌ
Bảo trì, bảo dưỡng: bao gồm lau chùi sản phẩm, sửa chữa những hỏng hóc nhỏ có thể sửa được (không bao gồm thay thế thiết bị). Thời gian bảo trì, bảo dưỡng tùy thuộc vào sự thỏa thuận giữa DOLA và Quý khách hàng.